John Simpson <jms1@jms1.net> 2017-04-01
This documents how I was able to set up a Mikrotik Cloud Hosted Router (CHR) on a VPS from Vultr.com. I'm using the CHR as an OpenVPN server, however this document will focus on getting the CHR up and running.
Vultr's lowest-cost VPS is $2.50/mo, and has significantly higher specs than any Mikrotik hardware I've ever used, so this is what I'm using for my CHR.
Like most VPS providers, Vultr offers a library of ISO images you can use to install operating systems on your servers. Mikrotik doesn't have an "installer" for CHR, just a pre-made disk image, so we're going to download that image from Mikrotik's web site, upload it to Vultr as a "snapshot", and create a new VM using that snapshot.
By itself this does work, however it gives you a CHR with only 128 MB usable storage, which is kinda strange - if you're paying for VM with 20 GB of space, you would expect to have 20 GB of space available within the VM, right?
When installing CHR on other systems (such as VirtualBox or VMWare) you would normally resize the virtual disk before starting the VM for the first time, and the CHR image would expand the filesystem to use the rest of the un-allocated space within the disk. This filesystem expansion only happens the very first time a VM is started from a Mikrotik image.
Vultr automatically starts the VM after copying the snapshot to the virtual disk, without offering any mechanism to edit the disk before it starts.
One option would be to resize the disk image before uploading it, however in this case that would mean uploading 20 GB of empty space, which is a waste of time, bandwidth, and disk space (both for you and for Vultr). It's bad enough that you have to upload 128 MB when you really only need about 50 MB (if only Vultr would allow qcow2 images...)
So instead, we're going to let the VM start normally, shut it down, reboot into Finnix (which is a "live CD", the ISO is in Vultr's library), use that to manually resize the partition and filesystem, and then reboot into the CHR normally.
This document assumes that:
You already have an account with vultr.com.
You're using a normal Unix-type shell, within a terminal window on a workstation with a GUI (i.e. a Linux or Mac workstation). If you're using Windows, you should be able to use something like SecureCRT or Putty instead of the ssh commands shown below, but I can't really help with that (I haven't used Windows on a daily basis since Windows XP SP1.)
You have access to a public-facing web site, and you know how to upload the file to that site. (You will need to copy the 128MB uncompressed CHR image to a web server so that Vultr can download it.)
If you plan to use IPv6, you have Wireshark installed on your workstation and are familiar with its basic operations (i.e. inspecting packets from a .pcap file.)
You have read this entire page, and understand the process, before trying to actually do anything.
Visit Mikrotik's download page. Under the "Cloud Hosted Router" section you will be able to download disk images for VMWare, VirtualBox, Microsoft Hyper-V, and a "Raw disk image". Download the "Raw disk image" for the desired version. I recommend using the "Current" version.
The file you download will be a .zip file. Unzip it, and you should have a file with a name like "chr-6.38.5.img". (This file will be 128 MB.)
Vultr's web site does not offer a way to upload a snapshot file directly, so you will need to first upload the resulting .img file to a web server in order to have a URL from which Vultr's servers can download it.
Sign into https://my.vultr.com/ and select the "Snapshots" tab. Click the "Add Snapshot" button, and scroll down to "Upload snapshot from remote machine". Enter the URL from which your unzipped .img file can be downloaded (such as "https://www.jms1.net/mikrotik/chr-6.38.5.img") and click the "Upload" button.
You should see a "Snapshot downloading" banner at the top of the screen. Click the grey "<-" button at the top left to return to the list of snapshots. You will see an entry with the status "Pending". It doesn't appear to start downloading the file right away, so you may want to wait a minute or two and then reload the page.
Once Vultr has finished downloading the file from your server, when you reload the page it will say "Available".
Pretty much every page on the my.vultr.com site has a blue circle with a "+" at the top right. Click this button to set up a new server. I used the following options:
Server Location - I chose Atlanta, because it's close to me in Florida, and I already have another VM hosted there. Choose whatever location makes sense for your situation.
Server Type - Immediately below the "(2) Server Type" banner is a row of options - "64 bit OS", "32 bit OS", "Application", etc. The last item on this list is "Snapshot" (you may need to click the blue ">" to the right of the list in order to see it.) Select "Snapshot", and then choose the snapshot file you just uploaded.
Server Size - I went with the smallest, which is 20 GB SSD, 1 CPU, 512MB Memory, and 500 GB Bandwidth, for $2.50/mo. This is already significantly "stronger" than most Mikrotik routers, and you can always upgrade later if you need to, so this is what I went with.
Additional Features
Server Hostname & Label - whatever you want to call them.
When you're done, skip down and read the "Security" section below, then come back to this point.
After you've read the security section and know what you'll need to do as soon as the VM is working, go ahead and click the blue "Deploy Now" button at the bottom. The browser will return to the list of your VMs.
While Vultr is setting up the VM, it will show up on the list as "Installing". It may or may not have an IP address by the new VM - if not, reload the page once or twice until the IP address shows up.
When it finishes building the VM, the status on the list will change to "Running".
AS SOON AS THE VM IS RUNNING, you should ssh into the admin user on the new VM, change the password, and make sure nobody else ssh'd into it before the password was changed.
Note that it may take 30-45 seconds after the VM shows "Running" before the SSH service will allow you to connect. If your ssh command just hangs there for more than about ten seconds, cancel it and try again.
$ ssh admin@xx.xx.xx.xx
...
[admin@MikroTik] > /user set admin password="xyzzy"
After doing this, make sure that nobody else managed to get in there before you changed the password. If /user active print shows more than one session, somebody else is in there. RouterOS doesn't have a way to forcibly disconnect such as user (or if they do, I'm not aware of it) so if this happens, your best bet may be to destroy the VM and create a new one.
[admin@MikroTik] > /user active print
Flags: R - radius, M - by-romon
 #    WHEN                 NAME   ADDRESS
 0    mar/30/2017 01:49:24 admin  xx.xx.xx.xx
You will almost certainly see messages popping up about login failures from random IPs around the world. This is because when the CHR starts up for the first time, it is more or less "wide open", with telnet, ftp, ssh, and a few other services listening on their default ports, and no firewall rules at all. There are thousands of black-hat hackers out there, scanning large blocks of IP addresses for devices with open services, and they will try to connect to your CHR as soon as it boots up.
The following commands will disable all of these services except ssh, and will change the port number on which the ssh service is listening.
[admin@MikroTik] > /ip service disable [find where name!=ssh]
[admin@MikroTik] > /ip service set ssh port=12345
There are also a few options you should set to increase the security of the SSH server.
[admin@MikroTik] > /ip ssh set strong-crypt=yes host-key-size=4096
After changing the SSH host key size, you also need to re-generate the host key. (Note that you may not see the "y" echoed back to you immediately. It took about fifteen seconds to generate the new key before the "y" appeared in the terminal window while I was writing this document.)
[admin@MikroTik] > /ip ssh regenerate-host-key
This will regenerate current SSH host keys (changes will take affect only after service restart or reboot), yes? [y/N]:
y
02:37:32 echo: ssh,critical SSH host key regenerated, reboot or service restart required!
At this point the CHR needs to be rebooted. We're about to shut it down anyway, so don't worry about doing this just yet.
If you look at the available storage, you'll see that RouterOS thinks the disk is only 96 MB, which is strange because the VM is 20 GB.
[admin@MikroTik] > /system resource print
...
           free-hdd-space: 69.9MiB
          total-hdd-space: 95.3MiB
...
The very first time a CHR boots up from a new Mikrotik image, it will expand the partition to use any empty space at the end of that image. When building a CHR on osme other virtualization platform, the instructions say to resize the disk before starting it up the first time. However, Vultr doesn't offer a way to do this, so we're going to have to resize it by hand.
First, shut down the CHR.
[admin@MikroTik] > /system shutdown
Shutdown, yes? [y/N]:
y
system will shutdown promptly
Back on the my.vultr.com web site, go back to the list of your VMs. After about 45 seconds, if the VM still says "Running", click on the "..." menu to the right and select "Server Stop" to make sure it shuts down.
Once the instance says "Stopped", we need to attach and boot a Finnix ISO in order to access the underlying virtual disk.
Click on the VM's name. This should take you to a "Server Information (xxx)" page.
Just below the page title, click on the "Settings" tab.
On the left, click on "Custom ISO". You will see a drop-list of ISO images in Vultr's library. Select the "Finnix" option on this list (currently it says "Finnix - 111 x86" but the version number may change in the future), then click the blue "Attach ISO and Reboot" button.
After about 20 seconds, click the "View Console" icon at the top right (it looks like a monitor with ">_" on it). This will open a new browser window with the VM's console. You should see the VM booting up, or you may see the Finnix boot menu with the 60-second countdown going.
On the Finnix boot menu, press the down arrow to stop the countdown timer, then move up or down to select "Boot Finnix (64-bit)", and press ENTER to boot.
Run "fdisk -l" to find out what the disk device is called, and what the current partition sizes are.
root@tty1:~# fdisk -l
...

Disk /dev/vda: 20 GiB, 21474836480 bytes, 41943040 sectors
Units: sectors of 1 * 512 = 512 bytes
Sector size (logical/physical): 512 bytes / 512 bytes
I/O size (minimum/optimal): 512 bytes / 512 bytes
Disklabel type: dos
Disk identifier: 0x00000000

Device     Boot Start      End  Sectors Size Id Type
/dev/vda1  *        1    65536    65536  32M 83 Linux
/dev/vda2       65537 41943039 41877503  20G 83 Linux
As you can see, there are two partitions. The size of the filesystem within the second partition is what RouterOS is showing in the "/system resource print" output.
In the case of Vultr, the second partition already covers the entire disk, so we don't need to resize it. (I will admit, I'm not exactly clear how the partition was resized, unless Vultr did it when importing the snapshot - and if this is the case, I don't know why RouterOS didn't resize the filesystem when it started the first time.)
If you are adapting these directions for some other VPS host, the general procedure for resizing the partition is:
/dev/vda2", but with another VPS host it may be "/dev/sda2", or some other name./dev/vda2" line, write down the "Start" number.fdisk /dev/vda" to edit the partitions.
parted, if you're more comfortable with it.vda2. (i.e. "d", "2")vda2, using the same starting sector, and allowing fdisk to choose the end. It should automatically choose the highest valid number, which will make the "new" /dev/vda2 use all free space on the disk. (i.e. "n", "p", "2", the starting sector you wrote down above, and just hit ENTER)w")The next step (and the whole reason for doing this) is to resize the filesystem within the partition.
Check the filesystem. This command will find and fix any errors it finds. (If you don't do this, and the filesystem wasn't cleanly un-mounted before, the "resize2fs" command below will refuse to do anything.)
root@tty1:~# e2fsck -fy /dev/vda2
e2fsck 1.42.13 (17-May-2015)
Backing up journal inode block information.

Resize inode not valid.  Recreate? yes

Pass 1: Checking inodes, blocks, and sizes
Pass 2: Checking directory structure
Pass 3: Checking directory connectivity
Pass 4: Checking reference counts
Pass 5: Checking group summary information
Block bitmap differences:  +1225
Fix? yes

system: ***** FILE SYSTEM WAS MODIFIED *****
system: 232/6144 files (2.2% non-contiguous), 6742/24575 blocks
Resize the filesystem. Running the command without specifying a size will expand it to use the entire available space on the disk.
root@tty1:~# resize2fs /dev/vda2
resize2fs 1.42.13 (17-May-2015)
Resizing the filesystem on /dev/vda2 to 5234687 (4k) blocks.
The filesystem on /dev/vda2 is now 5234687 (4k) blocks long.
Shut down Finnix.
root@tty1:~# halt
Back in the browser, go back into "Settings", "Custom ISO", and click the blue "Remove ISO" button. Note that doing this will reboot the VM.
When you try to ssh into the CHR again, you will see this message...
@@@@@@@@@@@@@@@@@@@@@@@@@@@@@@@@@@@@@@@@@@@@@@@@@@@@@@@@@@@
@    WARNING: REMOTE HOST IDENTIFICATION HAS CHANGED!     @
@@@@@@@@@@@@@@@@@@@@@@@@@@@@@@@@@@@@@@@@@@@@@@@@@@@@@@@@@@@
IT IS POSSIBLE THAT SOMEONE IS DOING SOMETHING NASTY!
Someone could be eavesdropping on you right now (man-in-the-middle attack)!
It is also possible that a host key has just been changed.
...
You're seeing this because we changed the SSH host key before shutting it down. You will probably need to tell your workstation to "forget" the old host key, using a command like this:
$ ssh-keygen -R xx.xx.xx.xx
After you log in, check the size of the disk again...
[admin@MikroTik] > /system resource print
...
           free-hdd-space: 19.8GiB
          total-hdd-space: 19.9GiB
...
As you can see, RouterOS is now aware of the full size of the virtual disk.
Vultr's directions tell you to configure your VM's ethernet interface to use what they refer to as "auto-configuration", which is "IPv6 Stateless Address Autoconfiguration" or "SLAAC" (see RFC 4862 for details), to get its IPv6 address. In most cases this would be fine, however this VM is a router, and Mikrotik is strictly following the rules, which say that IPv6 routers (devices which receive and forward packets which are not addressed to themselves) are not supposed to do SLAAC.
If you enable IPv6 for a VM, Vultr will assign a /64 block to that VM, and tells you what IPv6 address it would receive, if it were doing SLAAC. The one thing it doesn't tell you is what your IPv6 default gateway should be.
What this means is, you may be able to turn on IPv6, but you can't send traffic beyond the local network.
What I had to do was use the Mikrotik's packet sniffer to capture a few minutes' worth of IPv6 traffic on the ether1 interface, download the resulting file, and use Wireshark to find and inspect the RA packet which the CHR is receiving but ignoring.
This command configures the Mikrotik "sniffer" tool to capture any IPv6 traffic sent to ff02::1, which is the multicast "All Nodes" address. The RA packets we're looking for are sent from the router, to this address. These packets will physically arrive on the ether1 interface, even though RouterOS ignores them.
[admin@MikroTik] > /tool sniffer set \
    only-headers=no \
    file-name=ipv6.pcap \
    file-imit=16384 \
    filter-stream=yes \
    filter-interface=ether1 \
    filter-mac-protocol=ipv6 \
    filter-ipv6-address=ff02::1 \
    filter-direction=rx
[admin@MikroTik] > /tool sniffer start
The sniffer is watching the incoming traffic, and writing any packets which match its filter conditions to the ipv6.pcap file. The next step is to watch this file.
Routers generally send RA packets once every 3-10 minutes, so you may have to wait a while. We could run "/file print" over and over again, but RouterOS has a way to make it easier...
[admin@MikroTik] /tool sniffer> /file print interval=1 where name=ipv6.pcap
 # NAME                   TYPE                        SIZE CREATION-TIME
 0 ipv6.pcap              .pcap file                    24 apr/01/2017 18:23:37
This shows you an automatically updating "directory listing" of the capture file which is being created. At first the file will be 24 bytes, but as matching packets are received, they will be added to the file, and you will see the file's size grow, usually by about 150-200 bytes per packet.
Once you have a few packets, type "Q" to stop the file listing, then stop the sniffer.
[admin@MikroTik] > /tool sniffer stop
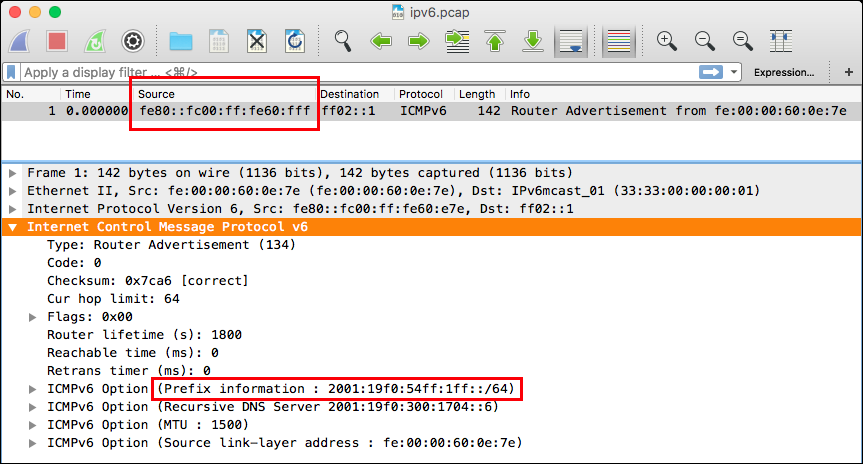
Then, on your workstation, download the ipv6.pcap file from the router, and open it using Wireshark. (My Mac OSX laptop automatically uses Wireshark to open "*.pcap" files.)
$ scp admin@xx.xx.xx.xx:ipv6.pcap .
$ open ipv6.pcap
Find a "Router Advertisement" packet, and look for two things:
The packet's source address.
The "Prefix information" within the ICMPv6 payload.
Give the ether1 interface an IPv6 address within that prefix, with the same netmask. (i.e. within 2001:19f0:54ff:1ff::/64).
[admin@MikroTik] > /ipv6 address add interface=ether1 address=2001:19f0:54ff:1ff::1/64
Then, add an IPv6 default route, pointing to the packet's source address. Note that because the gateway address is a link-local address, you need to add "%ether1" to the end of the address in order to specify the interface.
[admin@MikroTik] > /ipv6 route add dst=address=::/0 gateway=fe80::fc00:ff:fe60:fff%ether1
Once this is done, you should be able to ping any real IPv6 address. (The address shown below is "google.com".)
[admin@MikroTik] > /ping count=3 2607:f8b0:4008:80a::200e
  SEQ HOST                                     SIZE TTL TIME  STATUS
    0 2607:f8b0:4008:80a::200e                   56  56 35ms  echo reply
    1 2607:f8b0:4008:80a::200e                   56  56 35ms  echo reply
    2 2607:f8b0:4008:80a::200e                   56  56 35ms  echo reply
    sent=3 received=3 packet-loss=0% min-rtt=35ms avg-rtt=35ms max-rtt=35ms
And, from a machine which also has IPv6 connectivity, you should be able to ping the address you assigned to the ether1 interface.
$ ping6 -c 3 2001:19f0:54ff:1ff::1
PING 2001:19f0:54ff:1ff::1(2001:19f0:54ff:1ff::1) 56 data bytes
64 bytes from 2001:19f0:54ff:1ff::1: icmp_seq=1 ttl=57 time=1.02 ms
64 bytes from 2001:19f0:54ff:1ff::1: icmp_seq=2 ttl=57 time=0.884 ms
64 bytes from 2001:19f0:54ff:1ff::1: icmp_seq=3 ttl=57 time=0.942 ms

--- 2001:19f0:54ff:1ff::1 ping statistics ---
3 packets transmitted, 3 received, 0% packet loss, time 2026ms
rtt min/avg/max/mdev = 0.884/0.949/1.023/0.067 ms